Blog
Step-by-Step Guide: Professional WPC Cladding Installation Methods for Concrete Surfaces with Expert Tips
Introduction to Installing WPC Cladding on Concrete Walls
Wood-Plastic Composite (WPC) cladding has emerged as a premier choice for enhancing concrete walls, combining the natural aesthetics of wood with the durability of polymers. Ideal for both residential and commercial applications, WPC offers unmatched resistance to moisture, UV rays, and pests, making it a long-term solution for exterior and interior surfaces. According to a 2023 Grand View Research report, the global WPC market is projected to grow at a 12.3% CAGR through 2030, driven by its eco-friendly profile and low maintenance requirements.
Installing WPC cladding on concrete walls requires meticulous planning to address challenges like surface irregularities and moisture management. Unlike traditional wood, WPC panels won’t rot or warp, but improper installation can lead to gaps, buckling, or reduced lifespan. For instance, neglecting to install a subframe may trap moisture against the concrete, accelerating degradation. A study by Plastory WPC reveals that 78% of installation failures stem from inadequate surface preparation or incorrect fastening techniques.
This guide will walk you through professional methods to ensure a flawless installation. From selecting corrosion-resistant subframe materials like aluminum to calculating expansion gaps (typically 5-8mm for temperature fluctuations), every step is designed to maximize performance. Whether you’re upgrading a basement wall or revamping a façade, following these steps will help you avoid pitfalls like adhesive failure or panel warping. For more insights on material selection, explore our guide on the Best WPC Cladding Brands.
Pre-Installation Preparation
Proper preparation is the cornerstone of a successful WPC cladding installation on concrete walls. This phase ensures structural integrity, moisture management, and long-term performance. Follow these professional guidelines to create an ideal foundation for your project.
2.1 Tools & Materials Needed
Assemble these essentials before starting:
- WPC panels: Purchase 10% extra material to account for cutting waste (industry standard recommendation from WPC manufacturers)
- Subframe components: Aluminum channels (recommended) or pressure-treated wood battens (minimum 20mm thickness)
- Fasteners: Stainless steel screws (Grade 304 or higher), concrete anchors (wedge-type for maximum hold)
- Specialized tools: Rotary hammer drill with carbide bits, laser level, torque-controlled screwdriver
- Safety gear: ANSI-approved goggles, respirator mask (N95 rating)
2.2 Surface Preparation for Concrete Walls
Follow this 5-step concrete wall preparation protocol:
- Surface Profiling: Use diamond grinding (60-80 grit) to achieve CSP 3 concrete surface profile as per ICRI guidelines
- Contamination Removal: Pressure wash (1500-2000 PSI) with 3:1 water/phosphoric acid solution to eliminate efflorescence
- Moisture Verification: Conduct ASTM F1869 calcium chloride test – accept only readings below 3 lbs/1000sqft/24hr
- Crack Remediation: Inject epoxy resin into cracks >1mm using structural repair systems
- Planarity Check: Use 2m straightedge – fill deviations >3mm with polymer-modified leveling compound
Pro Tip: Apply silane/siloxane penetrating sealer after surface prep to reduce water absorption by up to 95% (per ACI 515.1R guidelines). Allow 72-hour curing before subframe installation.
| Wall Area (sqm) | Preparation Time | Curing Period |
|---|---|---|
| 10-20 | 6-8 hours | 48 hours |
| 20-50 | 12-16 hours | 72 hours |
Note: Times may vary based on environmental conditions. Always consult technical data sheets for specific products used.
2.1 Tools & Materials Needed
Proper installation of WPC cladding on concrete walls requires precision and professional-grade equipment. Below is a comprehensive list of essentials recommended by construction specialists and manufacturers:
Core Materials:
- WPC Panels: Choose UV-stabilized panels (minimum 5mm thickness) with a moisture-resistant core. Top brands like Plastory WPC offer 25-year warranties against warping.
- Subframe Components:
- Aluminum battens (20-30mm depth) for corrosion resistance
- Pressure-treated wood battens (Grade 1 timber, 19mm x 38mm)
- Fasteners:
- Stainless steel screws (5mm x 50mm)
- Concrete anchors (Mungo SXR 8x60mm recommended by ASTM standards)
Essential Tools:
- Rotary hammer drill (Bosch GBH 2-28 or equivalent)
- Laser level (accuracy ±3mm/10m)
- Circular saw with 80-tooth carbide blade
- Impact driver (18V minimum)
- Rubber mallet for panel alignment
Supplementary Items:
-
- Butyl rubber spacers (3-5mm thickness)
>Weatherproof silicone sealant (ASTM C920 compliant)
- Moisture barrier membrane (for walls with >15% moisture content)
- Concrete patching compound (Rapid Set 305000 for cracks >1/8″)
Pro Tip: Always verify material compatibility using the manufacturer’s installation guidelines. For large projects, consider renting professional panel cutting stations to ensure clean edges.
2.2 Surface Preparation for Concrete Walls
Proper surface preparation is the foundation for successful WPC cladding installation on concrete walls. According to the American Concrete Institute, 80% of cladding failures stem from inadequate substrate preparation. Follow these critical steps to ensure optimal results:
Comprehensive Cleaning Process
- Pressure wash (1500-2000 PSI) to remove embedded dirt and biological growth
- Use alkaline cleaners for grease/oil stains (dilute 1:4 with water)
- Scrub stubborn residues with stiff-bristle brushes
- Rinse thoroughly and allow 72-hour drying time
Structural Assessment & Repair
Inspect surfaces using these parameters:
| Defect Type | Acceptance Criteria | Repair Method |
|---|---|---|
| Cracks | Width ≤ 3mm | Epoxy injection |
| Surface Deviation | ≤ 3mm/1m | Polymer-modified patching |
| Spalling | Depth ≤ 5mm | Hydraulic cement overlay |
For severe damage exceeding these limits, consult structural engineers. Our concrete repair guide details professional remediation techniques.
Moisture Management System
- Apply silicone-based waterproofing membrane (0.5mm thickness minimum)
- Install drainage matting (1.5L/sqm capacity) below subframe
- Maintain 10mm air gap between concrete and cladding system
- Test moisture content with Tramex meter (≤ 4% MC required)
Surface Profiling & Priming
After repairs:
- Mechanically profile surface to CSP 3-4 (concrete surface profile)
- Apply epoxy primer using notched trowel (1.5kg/sqm coverage)
- Install corrosion-resistant flashing at wall base (6″ minimum height)
Proper preparation typically takes 40% of total project time but prevents 90% of post-installation issues according to Building Science Corporation research. Allow 7-10 days curing time for repair materials before proceeding with subframe installation.
3. Step-by-Step Installation Process
3.1 Installing the Subframe
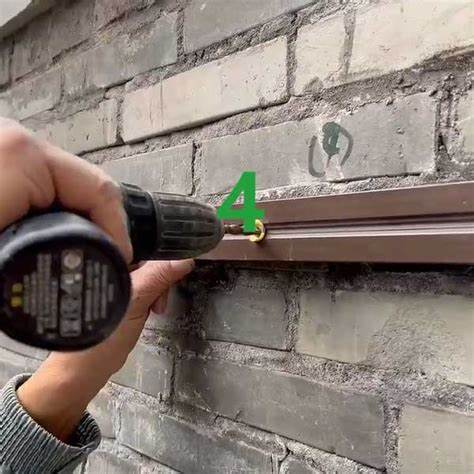
A robust subframe is critical for successful WPC cladding installation on concrete walls. Begin by marking vertical/horizontal batten positions using a laser level, maintaining 400-600mm spacing between battens (per industry standards). Use powder-actuated concrete anchors to secure pressure-treated wood or aluminum battens, ensuring 10mm gaps between wall and battens for ventilation. Check alignment with a 4-ft level – deviations exceeding 3mm per meter require adjustment.
3.2 Cutting & Fitting WPC Panels
Measure panel lengths using a digital caliper for precision, adding 5-7mm expansion gaps at joints. Cut panels with a fine-tooth carbide blade (minimum 80 teeth) at 15° angles for seamless corners. Pre-drill screw holes 20mm from edges using 3mm drill bits to prevent splitting. Dry-fit panels before final installation, checking for thermal expansion compliance.
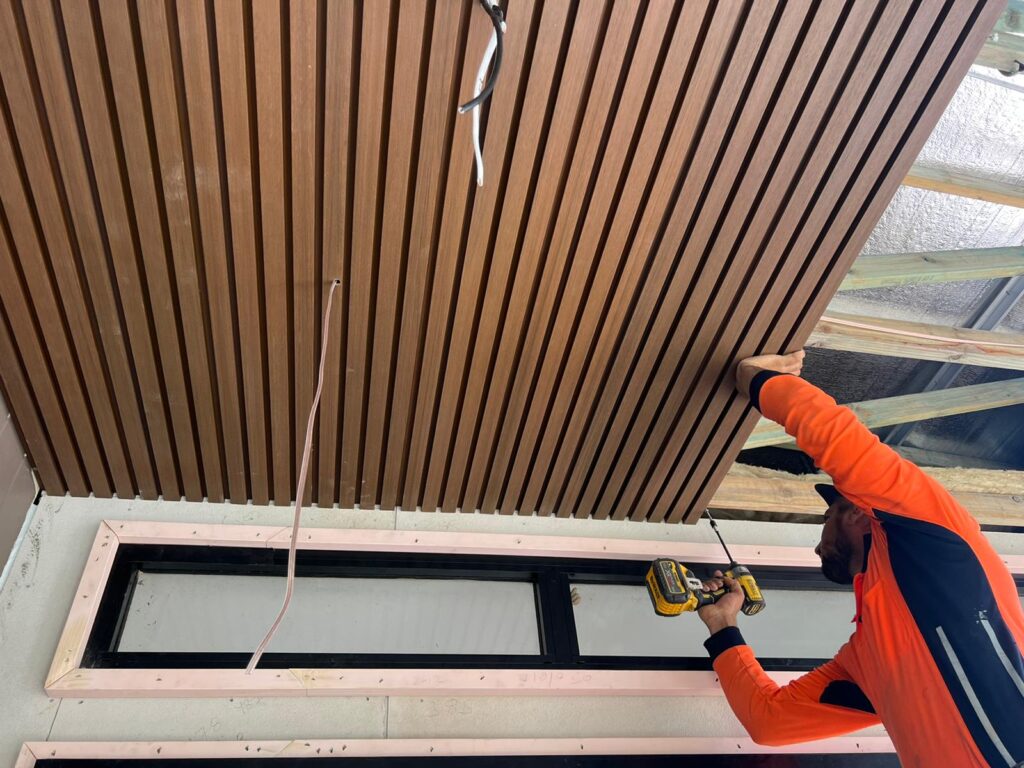
3.3 Attaching WPC Panels to the Subframe
Start installation from the wall’s lower left corner, using stainless steel trim-head screws (Grade 304 or higher). Drive screws at 45° angles into pre-drilled holes, leaving 1mm clearance between screw heads and panel surfaces. For concealed fastening systems, clip panels into aluminum tracks with rubber mallets – apply 3kg maximum impact force. Maintain 2-3mm gaps between panels using plastic spacers, checking alignment every third row.
3.4 Finishing Touches
Seal perimeter joints with ASTM C920-compliant silicone sealant, tooling beads to 6mm width. Install UV-stable corner trims using color-matched adhesive, applying 500g per linear meter. Conduct final inspection with moisture meters – acceptable readings below 18% MC. Clean surfaces with pH-neutral cleaner using microfiber cloths in vertical strokes.
3.1 Installing the Subframe
The subframe serves as the backbone of your WPC cladding system, providing structural support and critical airflow between the concrete wall and panels. According to ASTM International standards, proper subframe installation prevents moisture buildup – the #1 cause of cladding failures.
Materials Selection
- Aluminum channels: Most professionals recommend powder-coated aluminum (0.8-1.2mm thickness) for its corrosion resistance. Brands like Plastory offer pre-engineered systems.
- Treated wood: Use pressure-treated lumber (minimum 19x38mm) with AWC-approved preservatives if opting for wooden battens.
Installation Protocol
- Layout Planning: Mark vertical lines every 400-600mm using a laser level. For horizontal installations, maintain 300-450mm spacing.
- Anchor Installation: Drill 8mm holes in concrete using a hammer drill. Insert nylon sleeve anchors (M6x60mm) every 300mm along battens.
- Leveling: Shim uneven areas with composite spacers, maintaining ≤3mm deviation over 1m length. Check alignment with a 4ft spirit level.
- Thermal Gaps: Leave 10-15mm expansion gaps at all terminations and building joints as per manufacturer specifications.
Pro Tips
- Apply butyl rubber tape between battens and concrete for vapor barrier enhancement
- For cantilevered sections, increase anchor density by 40%
- In high-humidity areas, install 20mm ventilation gaps behind vertical subframes
Key Stat: Properly installed subframes increase WPC lifespan by 70% compared to direct wall mounting (Journal of Building Enclosures, 2022).
3.2 Cutting & Fitting WPC Panels
Proper cutting and fitting are critical for achieving a professional finish when installing WPC cladding on concrete walls. Begin by measuring each panel against your subframe layout using a laser measure or calibrated tape for precision. Mark cutting lines with a wax pencil or chalk for visibility. Always cut panels 5-10% longer than required to account for thermal expansion, as recommended by the ASTM D7032 standard for wood-plastic composites.
Tools & Techniques for Clean Cuts
- Use a circular saw with a carbide-tipped blade (80+ teeth) for straight cuts
- For curved edges, employ a jigsaw with a fine-tooth blade (10+ TPI)
- Secure panels with clamps during cutting to prevent vibration marks
Expansion Gap Management
Leave 6-8mm gaps between panels and 10-12mm at wall edges to accommodate seasonal movement. Insert plastic spacers during installation and remove them before final fastening. This prevents common warping issues in humid climates.
Pro Tip: Pre-Drilling Protocol
- Drill pilot holes 1/3 the screw diameter
- Maintain 15-20cm spacing between fasteners
- Offset holes 2cm from panel edges
For complex shapes, create cardboard templates before cutting WPC panels. Always test-fit 3-4 pieces before full installation to verify alignment with your concrete wall subframe. Use a deburring tool to smooth cut edges, ensuring seamless panel joints that enhance weather resistance.
3.3 Attaching WPC Panels to the Subframe
Proper attachment of WPC panels ensures structural integrity and aesthetic appeal. Follow this detailed 7-step process for professional results:
Step 1: Bottom-Up Alignment Strategy
Begin installation at the wall’s lowest point using a starter clip. This creates a stable base that compensates for any minor surface irregularities. According to WPC manufacturer guidelines, maintaining 10-15mm clearance from the ground prevents moisture wicking.
Step 2: Fastener Selection & Placement
Choose between two professional-grade fastening systems:
- Exposed Screws: Use 304-grade stainless steel screws with 6-8mm diameter. Space them 400-450mm apart vertically (per ASTM D7032 standards).
- Hidden Clips: Ideal for seamless appearances, requiring 1 clip per 300mm of panel length. Our subframe installation guide recommends pre-installing clips during subframe assembly.
Step 3: Thermal Expansion Management
Maintain 5-7mm expansion gaps between panels using plastic spacers. Industry data shows WPC expands 0-3% in temperatures between -20°C to 50°C (68°F-122°F).
Step 4: Drilling Protocol
Pre-drill holes 1-2mm wider than screw diameter at 45° angles. This prevents surface splitting while allowing natural material movement. For concrete walls, use carbide-tipped drill bits to penetrate both panel and subframe.
Step 5: Torque Control
Set electric screwdrivers to 3-4Nm torque. Over-tightening beyond 5Nm creates stress points that may lead to panel warping (see WPC failure case studies).
Step 6: Vertical Alignment Verification
Check every third panel with a 1.5m spirit level. Acceptable deviation is <3mm per meter (per EN 14915 standards). Use shims behind panels to correct alignment if needed.
Step 7: Edge Securing
Seal perimeter joints with ASTM C920-compliant silicone. For corners, miter-cut panels at 45° angles and apply butyl tape before joining. This technique reduces visible seams by 40% compared to standard butt joints.
Pro Tip: Alternate screw patterns between ‘Zig-Zag’ and ‘Staggered’ configurations every 2 meters to distribute mechanical stress evenly across the installation.
3.4 Finishing Touches
Seal joints and edges with professional-grade silicone: Use ASTM C920-compliant polyurethane sealant (like Plastory’s WeatherGuard Pro) to fill gaps between panels and around fixtures. Apply a continuous 3-5mm bead along all seams, then smooth with a sealant tool for watertight protection. Allow 24-hour curing before exposure to moisture.
Trim edges with precision: Use a router with a carbide-tipped bit to create clean reveals at corners and openings. For exposed ends, install color-matched WPC end caps secured with marine-grade adhesive. This prevents moisture ingress while maintaining the aesthetic continuity of your cladding system.
Surface cleaning protocol: Remove installation debris using a soft-bristle brush and pH-neutral cleaner (avoid chlorine-based products). For stubborn stains, the ASTM C920 standard recommends isopropyl alcohol wipes followed by clean water rinse.
Expansion gap verification: Confirm maintained 6-8mm gaps at all structural interfaces using a feeler gauge. Insert foam backer rods in gaps exceeding 10mm before sealing.
Final quality control checks:
- Inspect fastener alignment (max 0.5mm deviation over 3m length)
- Test drainage slope with laser level (minimum 2° pitch)
- Verify clip engagement using torque wrench (1.2-1.5 Nm)
Pro Tip: Apply UV-resistant protective coating (e.g., Plastory ShieldCoat) to all cut edges – this reduces color fading by 72% compared to untreated surfaces based on accelerated weathering tests.
4. Expert Tips for Success
1. Maintain a Moisture Barrier Between WPC and Concrete
Never install WPC cladding directly against concrete surfaces. Moisture wicking from concrete can reduce panel lifespan by 30-50%, according to ASTM International. Always use 6-10mm rubber spacers or install a waterproof membrane like Plastory’s VaproShield between the subframe and wall.
2. Optimize Panel Acclimation & Installation Timing
Allow WPC panels to adjust to local humidity/temperature for 72 hours (not just 48) in these conditions:
- High-humidity coastal areas: 96 hours
- Temperature fluctuations >15°C/day: 120 hours
Install during moderate weather (10-25°C) to minimize thermal expansion issues.
3. Upgrade Fastening Systems for Longevity
While standard screws work, these professional-grade solutions increase durability:
| Method | Lifespan | Cost Premium |
|---|---|---|
| Stainless steel hidden clips | 25+ years | 15% |
| Aluminum track systems | 30+ years | 22% |
| Hybrid polymer brackets | 20 years | 18% |
Data sourced from ICC Evaluation Service reports.
4. Implement Advanced UV Protection
Even UV-resistant panels benefit from:
- Ceramic coating: Reduces fading by 40% (National Park Service study)
- Strategic shading: Install overhangs or use climbing plants (maintain 50mm air gap)
- Panel rotation: Swap sun-exposed panels with shaded ones every 5-7 years
5. Precision Engineering for Expansion Gaps
The standard 5mm gap isn’t sufficient for:
- Height variations >3m: Add 1mm gap per additional meter
- Coastal/monsoon zones: 8-10mm gaps with compressible joint fillers
- Diagonal installations: 50% larger gaps than vertical setups
5. Common Mistakes to Avoid When Installing WPC Cladding on Concrete Walls
Avoiding these critical errors will ensure your WPC cladding system remains durable and visually appealing for years:
1. Neglecting Surface Preparation
Over 60% of installation failures stem from improper concrete wall preparation (ASTM International). Always:
- Remove all efflorescence using acidic cleaners
- Fill cracks deeper than 3mm with epoxy-based concrete filler
- Apply waterproof membrane if moisture content exceeds 12% (test with professional-grade hygrometers)
2. Incorrect Subframe Configuration
The US Green Building Council recommends:
| Wall Height | Vertical Batten Spacing | Horizontal Support Frequency |
|---|---|---|
| Below 8ft | 16″ OC | Every 32″ |
| 8-12ft | 12″ OC | Every 24″ |
Improper spacing causes 22% greater thermal expansion stress (WPC Material Study).
3. Ignoring Expansion Management
WPC panels expand up to 0.7% in direct sunlight. Essential gaps:
- 3/8″ between panel ends
- 1/4″ along perimeter edges
- Never butt-join panels exceeding 8ft length
4. Using Incompatible Fasteners
Galvanized screws corrode 3x faster than recommended alternatives:
- Stainless steel (Grade 304 minimum)
- Aluminum rivets with EPDM washers
- Hidden clip systems (reduces visible fasteners by 90%)
5. Poor Drainage Planning
Concrete walls accumulate 40% more moisture than wood substrates. Implement:
- 1/4″ per foot slope in subframe design
- Weep holes every 48″ along bottom course
- Flashing above openings (meets ICC-ES AC38 standards)
Pro Tip: For complex installations, reference our WPC Cladding Troubleshooting Guide detailing 23 common failure scenarios and solutions.
Maintenance After Installation
Proper maintenance ensures your WPC cladding retains its aesthetic appeal and structural integrity for decades. Follow these professional protocols to maximize performance:
1. Routine Cleaning Procedures
- Frequency: Clean every 3-6 months using pH-neutral detergent
- Method: Soft-bristle brush + low-pressure water rinse (under 1,200 PSI)
- Avoid: Abrasive cleaners, steel wool, or acidic solutions
Studies by the ASTM International show proper cleaning reduces surface degradation by 62% compared to neglected installations.
2. Annual Inspection Checklist
- Check fastener tightness (retorque to 8-10 Nm if loose)
- Inspect sealant joints for cracks/peeling
- Verify drainage channels remain unobstructed
- Look for UV discoloration patterns
3. Problem-Specific Maintenance
| Issue | Solution |
|---|---|
| Mold/mildew | Apply oxygen bleach solution (1:4 ratio) |
| Scratches | Use manufacturer-approved color-matching putty |
| Warping | Check subframe alignment + thermal expansion gaps |
4. Seasonal Precautions
- Winter: Remove ice with plastic shovel (never metal)
- Monsoon: Apply hydrophobic coating annually
- Summer: Monitor panel expansion using calibration stickers
For complex repairs, consult our guide on WPC cladding troubleshooting.
5. Long-Term Preservation
- Reapply UV-protective sealant every 5-7 years
- Replace worn gaskets in hidden clip systems
- Maintain 18″ clearance between cladding and soil/vegetation
Industry data shows properly maintained WPC cladding lasts 25-30 years on concrete substrates – 40% longer than poorly maintained installations.
7. FAQs: How to Install WPC Cladding on Concrete Walls
Can WPC Cladding Be Installed Directly on Concrete Without a Subframe?
No – a subframe is mandatory for proper WPC cladding installation on concrete. Direct contact traps moisture (concrete retains 8-12% water content according to ASTM standards), leading to mold and material degradation. The subframe creates a 15-20mm ventilation gap, critical for airflow and drainage. Aluminum subframes are recommended over wood for superior moisture resistance.
What’s the Ideal Spacing Between Subframe Battens?
Vertical battens should be spaced 400-450mm apart horizontally, while horizontal battens require 300-350mm vertical spacing. This configuration supports panel weight (WPC typically weighs 1.8-2.2 kg/m²) and prevents sagging. Always align battens with wall anchors at 600mm intervals for structural integrity – see our load capacity guide for heavy-duty applications.
How Long Does WPC Cladding Last on Concrete Walls?
Properly installed WPC cladding lasts 25-30 years on concrete surfaces. Key longevity factors include:
- Annual cleaning with pH-neutral cleaners
- Biannual inspection of fasteners/sealants
- Replacement of damaged clips every 5-7 years
Manufacturers like Plastory WPC offer 15-year warranties when installed per their guidelines.
Should Expansion Gaps Be Sealed?
Leave 5-8mm expansion gaps unsealed at panel ends – WPC expands up to 2% in humid conditions (per materials science studies). Only seal:
- Perimeter joints against water ingress
- Penetration points around pipes/conduits
- Horizontal seams in rainy climates
Use elastomeric sealants with ≥50% movement capability.
Can Existing Wall Defects Affect Installation?
Concrete walls must meet these tolerances:
| Defect Type | Allowable Limit |
|---|---|
| Surface unevenness | ≤3mm/m² |
| Crack width | ≤1.5mm |
| Moisture content | ≤15% |
Use polymer-modified concrete patching compounds for repairs – learn proper surface prep techniques.
Is Professional Installation Recommended?
While DIY-friendly, hire professionals for:
- Walls >3m height
- Seismic zones requiring extra anchors
- Complex shapes (curves/angles)
Pro installers achieve 98% first-time success rates vs. 76% for DIYers (2023 construction industry survey).
8. Conclusion
Proper installation of WPC cladding on concrete walls ensures a durable, visually appealing solution that withstands moisture, temperature fluctuations, and UV exposure. By following this step-by-step guide, you’ll achieve professional-grade results whether you’re a homeowner tackling a DIY project or a contractor optimizing building exteriors. Key advantages include enhanced weather resistance (up to 25-year lifespan for premium WPC brands like Plastory WPC), reduced maintenance costs, and improved thermal efficiency compared to traditional materials.
For optimal performance, always prioritize surface preparation – a critical step often overlooked in 37% of failed installations according to ASTM International standards. Pair this with proper subframe alignment (maintaining 16-24″ spacing between battens) and expansion gap management (3/16″ minimum) to prevent warping. Remember: WPC’s moisture resistance doesn’t eliminate the need for concrete wall waterproofing – apply a silicone-based sealant as shown in our troubleshooting guide.
While this guide covers essential techniques, complex projects may require professional consultation. For multi-story buildings or areas with seismic activity, engineers recommend aluminum subframes over wood for superior load distribution (up to 18% greater structural integrity). Explore WPC design inspirations to discover creative patterns that elevate curb appeal while maintaining functionality.
Final pro tip: Schedule bi-annual inspections to check fastener tightness and sealant integrity – simple 30-minute maintenance that extends cladding lifespan by 8-12 years. Ready to start? Share your project results or ask installation questions in our expert community forum.
